Development Workflow
This section describes the steps necessary to build Elyra in a development environment.
Requirements
Setting up your development environment
Install Miniconda Download and install a Python 3 version of Miniconda according to your Operating System
Create a new Python environment using a version that is supported by Elyra.
conda create -n <env-name> python
The Python version of your environment will match the miniconda version you installed. You can override the default by explicitly setting
python=3.10, for example.Activate the new environment
conda activate <env-name>
Verify your miniconda environment
python --version # should yield a version that is supported by Elyra
which python     # displays current `python` path
pip3 --version   # should be a recent version to avoid build issues
which pip3       # displays current `pip` path
Python path must be under miniconda envs folder. Confirm pip3 location matches where miniconda is installed.
Install a version of Node.js that is supported by Elyra.
conda install -y -c conda-forge/label/main nodejs
Verify node is installed correctly
node --version
Install Yarn
conda install -y -c conda-forge/label/main yarn
Verify yarn is installed correctly
yarn --version
Install GNU Make
Refer to the following link for installation instructions: GNU Make
To verify the installation, run
make. If you have yet to set up the repository, you should see a message like the following:make: *** No targets specified and no makefile found. Stop.
Once the repository is set up, running
makefrom that location should display the available tasks that are listed in the Build & Installation section below.
Setting up your Elyra Github repository
Fork the Elyra Github repository (if you haven’t already)
Make a local copy of Elyra fork
git clone https://github.com/<your-github-id>/elyra.git
cd elyra
Set
upstreamas described in the GitHub documentation
Building
Elyra is divided in two parts, a collection of Jupyter Notebook backend extensions,
and their respective JupyterLab UI extensions. Our JupyterLab extensions are located in our packages
directory.
Build & Installation
Elyra uses make to automate some of the development workflow tasks.
Issuing a make command with no task specified will provide a list of the currently supported tasks.
$ make

clean                          Make a clean source tree and uninstall extensions
container-images               Build all container images
docs                           Build docs
install-all                    Build and install, including examples
install-examples               Install example pipeline components
install-server                 Build and install backend
install                        Build and install
lint                           Run linters
publish-container-images       Publish all container images
release                        Build wheel file for release
test                           Run all tests (backend, frontend and cypress integration tests)
watch                          Watch packages. For use alongside jupyter lab --watch
You can build and install all Elyra packages with:
make clean install
You can check that the notebook server extension was successfully installed with:
jupyter serverextension list
You can check that the JupyterLab extension was successfully installed with:
jupyter labextension list
NOTE: When switching between Elyra major versions, it is recommended to clean your JupyterLab environment before a build. Theclean-jupyterlabremoves your JupyterLab packages and completely deletes your Jupyter workspace. Make sure to backup any important data in your environment before running the script. To clean your environment and install the latest JupyterLab:etc/scripts/clean-jupyterlab.shTo specify a JupyterLab version to be installed:etc/scripts/clean-jupyterlab.sh --version 2.2.9
Parallel Development with @elyra/pipeline-editor
You can install Elyra using a local build of @elyra/pipeline-editor with:
make clean install-dev
Back-end Development
After making code changes to the back-end, you can re-build Elyra’s Python package with:
make install-server
This command builds and installs the updated Python package independently, skipping any UI component build.
Restart JupyterLab to pick up the new code changes.
Front-end Incremental Development
Elyra supports incremental development using --watch. This allows you to make code changes to
front-end packages and see them without running make install again.
After installation run the following to watch for code changes and rebuild automatically:
make watch
Then in a separate terminal, using the same Python environment, start JupyterLab in watch mode:
jupyter lab --watch
When in watch mode JupyterLab will watch for changes in the build of each package and rebuild. To see your changes just refresh JupyterLab in your browser.
NOTE: JupyterLab watch mode will not pick up changes in package dependencies likeservices. So when making changes to services you will need to stop and restartjupyter lab --watchand not just refresh your browser.
Building the Elyra Container Image
Elyra’s container image can be built in two ways (production and development):
Development:
make elyra-image
By default, the command above will build a container image (development) with the changes that exist in your local branch.
Production:
From main branch:
make elyra-image TAG=3.7.0
or after checking out a git tag e.g. git checkout tags/v3.7.0
make elyra-image
In order to build from a particular release (production), you can pass a TAG parameter to the make command
or you can checkout the respective tagged release and omit the TAG parameter.
Official container images are published on Docker Hub and quay.io.
Developing Elyra against the Jupyterlab source repo
Sometimes it is useful to develop Elyra against a local build of Jupyterlab. To use a local build of Jupyterlab use the following steps in the same python environment.
Uninstall any pip installations of Jupyterlab. You can use
etc/scripts/clean-jupyterlab.sh --version devas mentioned above with--version devto not reinstall Jupyterlab at the end of the script.Build your local repo of Jupyterlab, step-by-step instructions can be found in the Jupyterlab documentation. Uninstalling in the previous step will also wipe any previous installations of a local build.
cdto thebuilder/directory in your Jupyterlab repo and runyarn link. The ElyraMakefilewill use this yarn link in step 6.In your Elyra repo, uncomment the following line in
tsconfig.base.jsonto tell Typescript to use the local Jupyterlab packages when building:"paths": { "@jupyterlab/*": ["../jupyterlab/packages/*"] },Comment out
jupyterlabandjupyterlab-lspin theinstall_requiressection ofsetup.pyin your Elyra repo. This will prevent Jupyterlab from being pip installed during the Elyra build. Note:jupyterlab-lspalso pip installs Jupyterlab when installedRun
make install-devto install Elyra using the linked@jupyterlab/builderfrom step 3.You can now start Jupyterlab by running
jupyter lab --dev-mode --extensions-in-dev-mode, this will automatically watch for changes in the Jupyterlab repo. To also watch for changes in Elyra runmake watchin a separate terminal in the same Python environment.
When you want to switch back to developing Elyra against a Jupyterlab release, you just have to undo the comments in
steps 4 and 5 and rebuild with make clean install
Analyzing automated test failures
The Elyra GitHub repository is configured to run automated tests whenever a pull request is opened. These tests include static code quality analysis and UI, server, and integration tests.
The test results can be accessed from the pull request or the actions tab. If the test log does not include enough details to diagnose failures, download and review test artifacts that might have been generated.
Accessing test artifacts
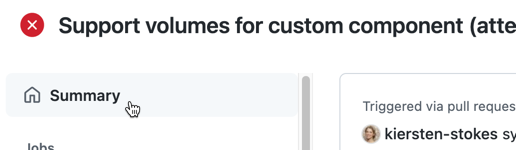
- Open the Elyra repository actions panel (
https://github.com/elyra-ai/elyra/actions). - Locate the failing workflow.

- Open the workflow.
- Click the ‘home’ (summary) button.
- Locate the ‘Artifacts’ section. If present, it should contain a download link.
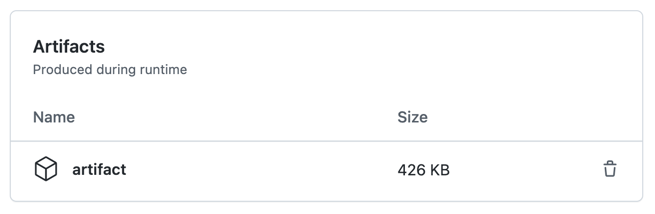
- Download the archive, extract it, and review the artifacts.